Unity Test Tools is a package that provides developers the components needed for creating and executing automated tests without leaving the comforts of the Unity editor. It is officially developed and maintained by the folks at Unity, released initially in December 2013, with a few updates in the following months. You can get it on the Asset Store and check out the full source code on BitBucket.
This post serves as a high level overview of the tools and not an in-depth drill-down, and covers the 3 components the tools are comprised of:
- Unit Tests
- Integration Tests
- Assertion Component
The package comes with detailed documentation, examples and the complete source code so you can make changes in case they are needed.
Unit Tests
There are many definitions to what a “unit test” is. In the context of this article it will be defined as a test that is:
- Written in code.
- Focuses on a single “thing” (method/class).
- Does not have “external dependencies” (e.g: does not rely on the Unity editor or needs to connect to an online service database).
Writing Unit Tests
To create unit tests, the package uses NUnit – a very popular framework that helps with the creation and execution of unit tests.
Also included is NSubstitute – a mocking framework that can create “fake” objects. These fakes are objects that are passed to the method under test instead of a “real” object, in cases where the “real” object can’t be created for testing since it relies on external resources (files, databases, remote servers, etc). For more information check out the NSubstitute site.
The following example shows a simple class that manages player health:
// A simple component that keeps track of health for game objects.
public class HealthManager
{
    public float healthAmount;

    public void TakeDamage(float damageAmount)
    {
        healthAmount -= damageAmount;
    }
}
Here is an example of a simple unit test for it:
<
pre class=””>
using NUnit.Framework;

[TestFixture]
public class HealthManagerTests
{
    [Test]
    public void TakeDamage_PositiveAmount_HealthUpdated()
    {
        // Create a health component with initial health = 50.
        var health = new HealthManager();
        health.healthAmount = 50f;

        health.TakeDamage(10f);

        // assert (verify) that healthAmount was updated.
        Assert.AreEqual(40f, health.healthAmount)
    }
}
In this unit test example, we can see that:
- A class containing unit tests should be decorated with the [TestFixture] attribute.
- A unit test method should be decorated with the [Test] attribute.
- The test constructs the class it is going to test, interacts with it (calls the TakeDamage method) and asserts (verifies) the expected results afterwards using NUnit’s Assert class.
*For more information on using NUnit, see the links section at the bottom of the article (Unit Testing Succinctly shows the usage of the NUnit APIs).
Note that structuring Unity scripts (e.g: MonoBehaviours) for being unit-testable is beyond the scope of this post, and will be explored in future post(s).
Unit Test Runner
After adding unit tests, we can run them using the unit test runner.
The included unit test runner is opened from the toolbar menu:
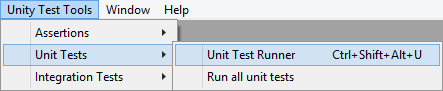
It is a basic runner that allows executing a single test, all tests in the project or all previously failed tests. There are other more advanced options, such as setting it to run automatically on code compilation. The test runner window displays all the tests in your project by organizing them under the class in which they were defined and can also display exception or log messages from their execution.
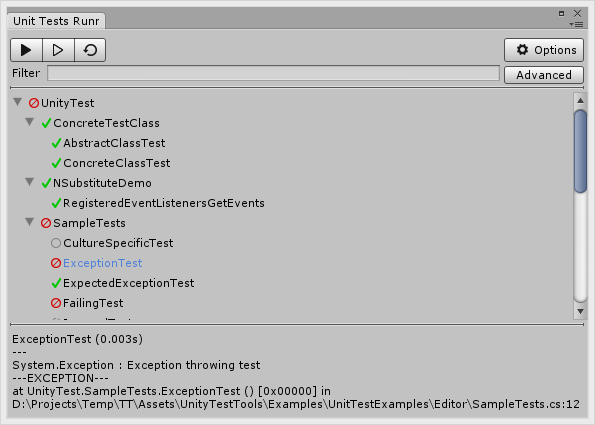
Unit Test Runner
The runner can also be invoked from code, making it possible to run all tests from the command line.
Unity.exe -projectPath PATH_TO_YOUR_PROJECT -batchmode -quit -executeMethod UnityTest.Batch.RunUnitTests -resultFilePath=C:\temp\results.xml
*The resultFilePath parameter is optional: It is used for specifying the path for storing the generated report of running all tests.
Integration Tests
Sometimes, unit tests are just too low-level. It is often desired to test multiple components, objects and the interaction between them. The package contains an Integration testing framework that allows creating and executing tests using real game objects and components in separate “test” scenes.
Writing Integration Tests
Integration tests, unlike unit tests, are not written in code. Instead, a new scene should be added to the project. This scene will contain test objects, each of which defines a single integration test.
Step by Step
Create a new scene used for testing (it can be helpful to have a naming convention for these scenes, so it’s easier to remove them later on when building the game).
Open the Integration Test Runner (from the toolbar menu).
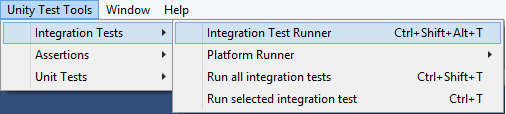
A new integration test is added using the + sign. When adding a test, a Test Runner object is also automatically added to the scene.
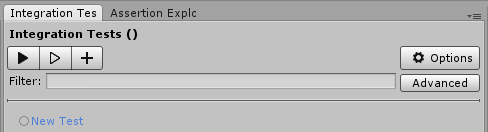
Integration Test Runner
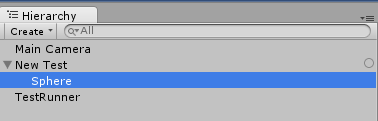
Pressing + adds a new test object to the scene hierarchy. Under this test object, all game objects that are needed for the integration test are added.
For example – a Sphere object was added under the new test:
The CallTesting script is added to this sphere:
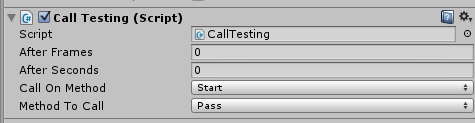
CallTesting script
Execution Flow
- The integration test runner will clean up the scene, and for every test, will create all game objects under that test (the Sphere in this case).
- The integration test runs in the scene with all the real game objects that were created.
- In this example, the Sphere uses the CallTesting helper script. This simply calls Testing.Pass() to pass the test. An integration test can pass/fail in other ways as well (see documentation).
The nice thing is that each test is run independently from others (the runner cleans up the scene before each test). Also, real game objects with their real logic can be used, making integration test a very strong way to test your game objects in a separate, isolated scene.
The integration test runner can also be invoked from code, making it possible to run all tests from the command line:
Unity.exe -batchmode -projectPath PATH_TO_YOUR_PROJECT -executeMethod UnityTest.Batch.RunIntegrationTests -testscenes=scene1,scene2 -targetPlatform=StandaloneWindows -resultsFileDirectory=C:\temp\
*See the documentation for the different parameters needed for command line execution.
Assertion Component
The assertion component is the final piece of the puzzle. While not being strictly related to testing per se, it can be extremely useful for debugging hard to trace issues. The way it works is by configuring assertions and when they should be tested.
An assertion is an equality comparison between two given arguments and in case it fails, an error is raised (the editor can be configured to pause if ‘Error Pause’ is set in the Console window). If you’re familiar with NUnit’s Assert class (demonstrated above), the assertion component provides a similar experience, without having to writing the code for it.
Working with Assertions
After adding the assertion component to a game object you should configure what is the comparison to be performed and when should it be performed.
Assertion Component
Step by Step
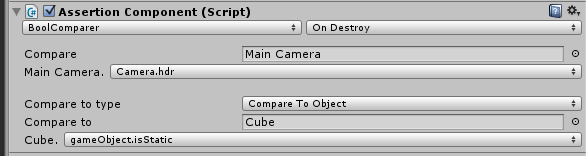
- Select a comparer type (BoolComparer in the screenshot above, but there are more out of the box). This affects the fields that can be compared (bool type in this case).
- Select what to compare – the dropdown automatically gets populated with all available fields, depending on the comparer that was selected. These may come from the game object the assertion component was added to, from other added components on the game object or other static fields.
- Select what to compare to – under “Compare to type” you can select another game object (whose fields will be used, again, according to the type of the chosen comparer) or a constant value to compare to.
- Select when to perform the comparison (in the screenshot above the comparison is performed in the On Destroy method). It is possible to have multiple selections as well.
When running the game, the configured assertion is executed (in the screenshot above – on every OnDestroy method, MainCamera.Camera.hdr will be checked that it matches Cube.gameObject.isStatic).
When setting up multiple assertions, the Assertion Explorer window provides a high level view of all configured assertions (accessed from the toolbar menu):

Assertion Explorer
The assertion component, when mixed with “Error Pause” can be used as a “smart breakpoint” – complex assertions and comparisons can be set up in different methods. When these fail the execution will break. Performing this while the debugger is attached can be an extremely efficient way to debug hard to find errors in your code.
Conclusion
Unity Test Tools provides a solid framework for writing and executing unit tests. For the first time, the tools needed for automated testing are provided in a single package. The fact that these are released and used internally by Unity shows their commitment and the importance of automated testing. In case you don’t test your code and wanted to start out – now would be an awesome time to do so.
Links
Books
- The Art of Unit Testing / Roy Osherove (Amazon)
- Unit Testing Succinctly / SyncFusion (Free Download)
- xUnit Test Patterns (Amazon)
Tools/Frameworks
This is a list of a few mocking frameworks worth checking out:
- NUnit
- NSubstitute
- Moq
- FakeItEasy
Why isn’t there a *single* exhaustive guide about how to write unit test in Unity ?
Even Unity can’t explain how their unit testing thingy works ! Does it have any unit testing ability at all ? Looks like it doesn’t, since you’re using NUnit with it… or perhaps their tool is *based* on NUnit ? Do I have to install NUnit separately, or is it included in Unity’s testing suite ?
So much unanswered questions. Seriously, how does anyone ever get to write unit tests in Unity ? I’ve been working on the questions for weeks, I’ve used countless framework, trying to avoid the puzzling situation that’s Unity’s testing suite.
Is there ANY page on the whole world wide web that explains how it freaking works ? Because this page sure as hell don’t explain anything. If it doesn’t start with “how to install”, then everything else is pretty much pointless imo.
This post covers “Unity Test Tools” – a package that already contains NUnit + a test runner directly in the editor. No need to install anything else other than this package (link above). Regarding how to actually write a unit test in unity – this can be divided into 2 – writing a unit test in general, and techniques for doing so within Unity (tips specific to Unity). There are a some links i have found on the web where people describing how they do it, but in general it is like writing any other unit test for any type of software.
My bad. The problem I was facing was due to a typo in the second code sample: it requires Nunit.Framework instead of NUnit.Framework !
And NUnit is indeed included in the Unity test suite.
is possible tested WWW class with or without StartCoroutine?
What would you like to test exactly ?
Pingback: Unity Test Tools | LevelUp! Studio LevelUp! Studio