A recent question about Continuous Integration and Unity led me to try and get something up and running.
The motivation was to see how hard it is to setup a basic CI system for auto building Unity projects and later on be used for running automated testing as well.
Here are my observations.
Disclaimer: although I consider myself to be a Unity noob, I am well experienced with CI, build servers, unit tests and other fancy software engineering practices.
Continuous Integration
The term “Continuous Integration” as I see it is actually an umbrella term for a few things:
- Code Integration – Building your code quickly that is triggered on every check in to the source control system.
- Automated Builds – Your code gets built automatically (and repeatedly) in a single automated step.
-
Automated Testing – Automated tests (whether unit tests or other types) that validate various pieces of functionality of your code.
Although many CI products are available today (free and commercial), i will focus on TeamCity out of 2 reasons:
- It is absolutely FREE (with some limitations).
- There is an open source project that offers building Unity projects from it directly.
Let’s get started!
Ingredients
In order to get started you will need to get the following:
Setup
Installing TeamCity
Installation of TeamCity is pretty straightforward, just “Next, Next” your way through it.
TeamCity uses a concept of “Build Agents”, which are basically a piece of software that does the actual building of the game.
The free version of TeamCity supports up to 3 build agents. For the sake of this example we are installing the server + agent on the same machine.
* Note that for larger setups, Unity must be installed on each machine that the agent will be installed on.
Installing Unity Build Runner
Configuring a new project
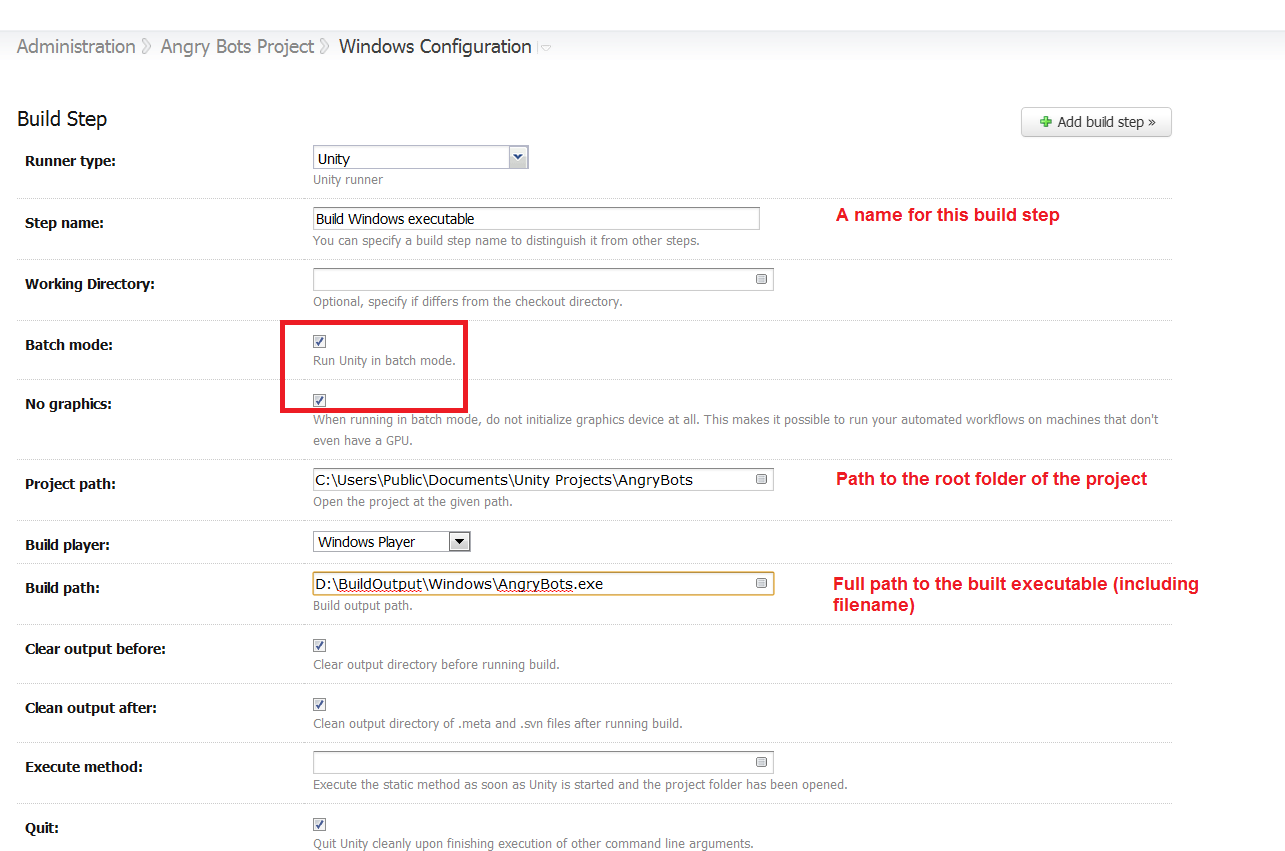
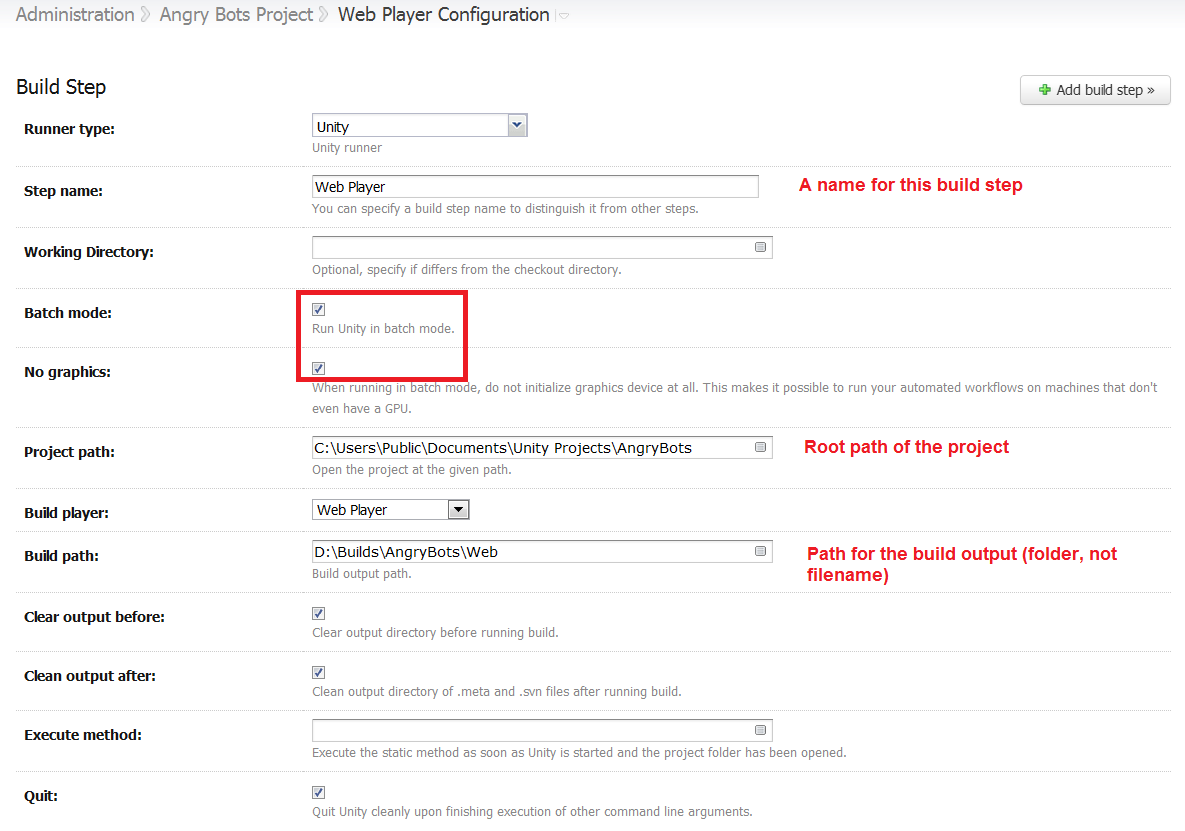
Here are the basic steps for configuring a new TeamCity project and 2 build configurations, that will build the “AngryBots” demo that comes with unity in 2 flavors (Web and Windows).
- Create a new project in TeamCity: Administration menu -> Create Project
 Add build configurations per platform you’d like to build (One for Windows and another for Web Player)
- Per configuration, add a build step with “Unity build runner”
That’s all there is to it! We have a basic CI system running that can automatically build Unity games in different flavors.
Optionally, A build trigger can be set per each configuration to start a build upon a source control check in. For the sake of our example the build will be started on demand from the TeamCity UI.
Caveats
Here’s a list of issues I’ve come across:
- In case of certain errors during the build, Unity build runner will fail to report these to the build log. I have already contacted the owner of this project, although i may attempt to fix it myself.
- When building a Windows version of the game, the path given to the build runner should be the .exe file’s full path. When building a web player project, the path should be a folder name.
- There are no mobile platforms (iOS/Android) available in the build runner dropdown. These are also not documented in Unity’s command line reference page (not sure if they are available).
- Unity enforces a single running instance per project. The command line mode runs the same executable, and so it will fail to work when an instance of the engine is running and has the project being built open.
- Unity doesn’t have a separate compiler/builder platform. The engine’s executable needs to be loaded to build the game, which can be CPU and memory intensive.


It wouldn’t be too hard to add the iOS/Android platforms to the list of targets in the UI, but at present we’re not using them so we couldn’t easily test. I’m happy to give pointers to anyone who wants to add that…
I’ve also seen the odd weirdness in errors/reporting – it may be an issue with the log tailing code that’s being used in the plugin. It is on my to-do list to investigate those issues, so any details on those would be great.
Sadly it seems its not possible to open Issues on the github repository that’s branched from the original one so I would suggest opening issues here instead https://github.com/mcmarkb/Teamcity-unity3d-build-runner-plugin/issues – then at least they are tracked!
Hey,
we are trying a similar setup with Atlassian Bamboo (similar to TeamCity) but run into problems where Unity can’t find Direct3d 9. If I log into the server via remote desktop and start the build (cmd -> Nant -> Unity) from a terminal it works. But when the build runs from the Windows service -> Bamboo -> Nant -> Unity it fails to locate Direct3d 9.
If found a few leads including http://www.gamedev.net/topic/522951-continuous-integration-and-xna/ that indicate that you must be logged in locally at the machine creating the build and some workarounds for that.
I wonder, did you run into any of these issues?
If so, how did you solve them?
Thank you for the article!
Cheers,
Helmut
@Helmut I have worked with Bamboo, but not with their remote agents. Are they configured to run as services? if they are, tough luck, as services don’t get certain aspects of UI interaction, graphics card access may be one of them. A solution for this may be to run the agent as a process (possible with TeamCity agents) and not as a service. What is your exact setup?
@liortal53
We don’t use the remote agents yet. For now it’s all local on the server (Windows Server 2008 R2). Just the single default local built agent.
Just found out that it works when everything of the following is true
* Bamboo runs in console (it comes with a .bat file that runs the Java wrapper in a console)
* I am logged into the CI server via remote desktop
* The remote desktop window is visible. As soon as you minimize it, the CI server won’t have access to Direct3d.
This seems to be exactly what they described in http://www.gamedev.net/topic/522951-continuous-integration-and-xna/ and further links and also matches what you just mentioned. I will try their solution to keep a user logged in and the Direct3d context available.
Including this link for completeness
http://social.technet.microsoft.com/Forums/en-US/winservergen/thread/50cf7086-e666-41c7-bcd0-e1ece025904f/
it contains additional info about our setup and what I tried before I found the things mentioned above.
Thank you for the help!
Will update with the results as soon as I can try it out.
> There are no mobile platforms (iOS/Android) available in the build runner dropdown. These are > also not documented in Unity’s command line reference page (not sure if they are available).
you can call a static method with -executeMethod
http://unity3d.com/support/documentation/Manual/Command%20Line%20Arguments.html
and use the BuildPipeline UnityEditor class to create iOS and other builds.
doh! looks like my earlier comment was eaten.
@liortal53
We just use the default local agent for now.
I found out that it indeed works if Bamboo is run in a console instead of a service. It comes with a .bat that just uses the java service wrapper (http://wrapper.tanukisoftware.com/doc/german/download.jsp) to do that.
But additionally during testing the remote desktop window must remain visible for this to work. If you minimize the remote desktop window, the build fails. 😀
I’ll look into the solution in http://www.gamedev.net/topic/522951-continuous-integration-and-xna/ to keep a user logged into the server and the Direct3d9 context alive.
Will keep you updated.
For completeness, I originally asked at http://social.technet.microsoft.com/Forums/en-US/winservergen/thread/50cf7086-e666-41c7-bcd0-e1ece025904f/#50cf7086-e666-41c7-bcd0-e1ece025904f with more info about our setup and earlier attempts that failed.
@Helmut Using RDP in minimized mode can cause issues. Have a look at this article to show you how to get around it: http://blog.smartbear.com/post/10-10-11/testcomplete-tip-running-tests-in-minimized-remote-desktop-windows/
Note that this is not so robust as this has to be done for EVERY desktop that accesses the build server via RDP.
Yay, the solution to keep the Remote Desktop session open and the Direct3d context alive worked. Now we can create builds. I documented our specific variant at http://helmutduregger.wordpress.com/2012/04/23/continuous-integration-with-unity3d-on-windows-server-2008-r2-with-virtualbox-and-ubuntu/
Thank you for your help liortal53, that remote desktop minimization link could become handy too!
Great post. I know it’s been a couple years since it was published, but was curious if you ever got a decent unit testing build step in your process? Cheers~
Hi, i have continued investigating what’s available for Unity with (unfortunately) very little findings. I plan to try and survey the available tools as of today (as my previous check was few years ago).